How I built my blog with Cloudflare Products
Dec 14, 2022I wanted to update my old portfolio site for some time and wanted to replace it with a simple blog. I initially planned to build a static blog using some static site generators available and host it in Cloudflare Pages. But with the introduction of D1, I changed the plan to build a dynamic site. I built it as an Open-source project and its available in https://github.com/arjun-g/edge-blog. Here in this article, I will explain how I built this blog.
Requirement
All I needed was a simple blog in which I will be posting some tech articles. I want it to be lightweight, fast, Server Side Rendered and SEO optimized. And of course, it should be cheap as well.
Tech Stack
The products available in Cloudflare alone are good enough to build this and this is the Tech Stack I chose to build the blog.
- Cloudflare D1 as Database
- Cloudflare R2 for File Storage to store images and docs
- Cloudflare Pages for hosting static (html, css and js) files
- Cloudflare Functions for rendering the blog content dynamically at the edge
- Cloudflare Web Analytics for analytics
- Cloudflare Access for securing the admin dashboard
Database
As mentioned previously the database I used is Cloudflare's D1 which is built on SQLite. Below is the schema of the DB.
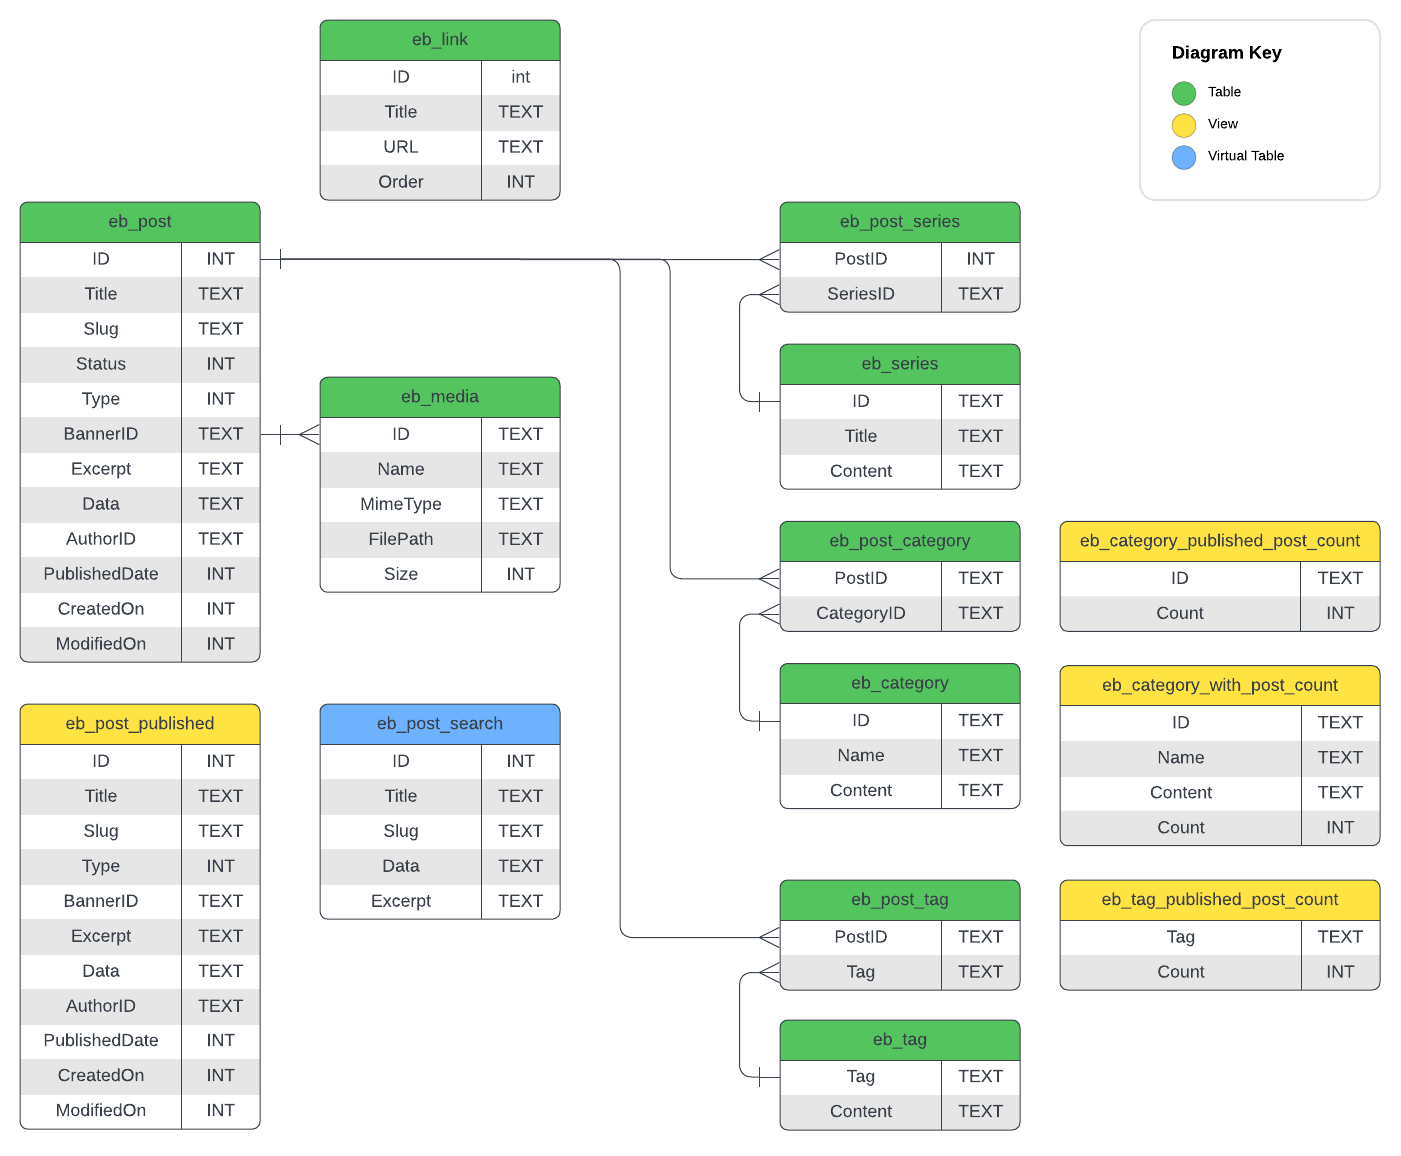
Schema Diagram of the Database
Media Storage
For storing media file like Banner Images, Images in the post and attachments in the posts I needed a storage system. I chose R2 object storage because it was easier to integrate in the Worker and cheaper.
Server Side Rendering
The blog is composed of just HTML, CSS and JS files without any frameworks involved. The HTML is split into root a file and templates for different parts. There are two types of page layouts in the blog - One to display the post content and other to display the list of posts (for home page, posts in category, tag, search). Below is the wireframe of the layouts.
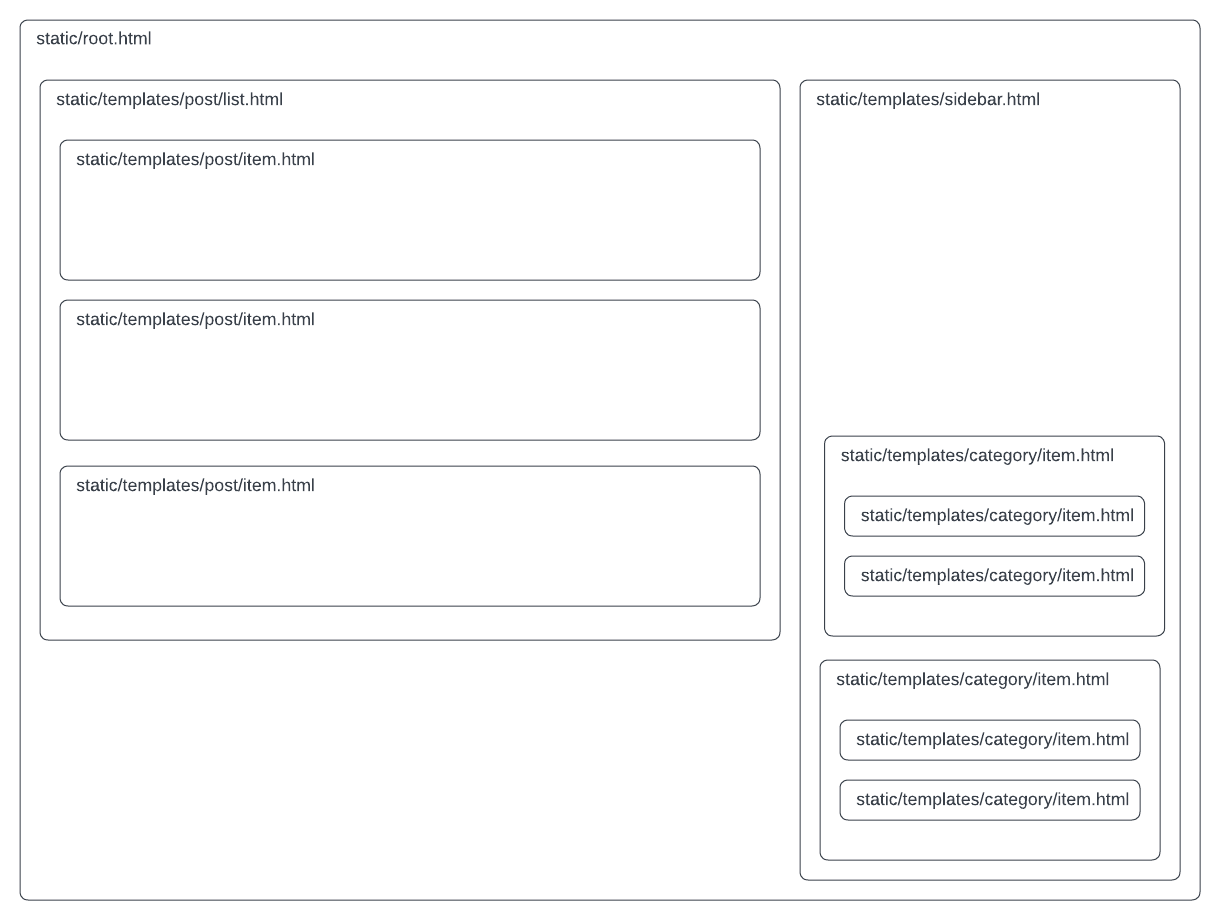
Layout wireframe of post list page
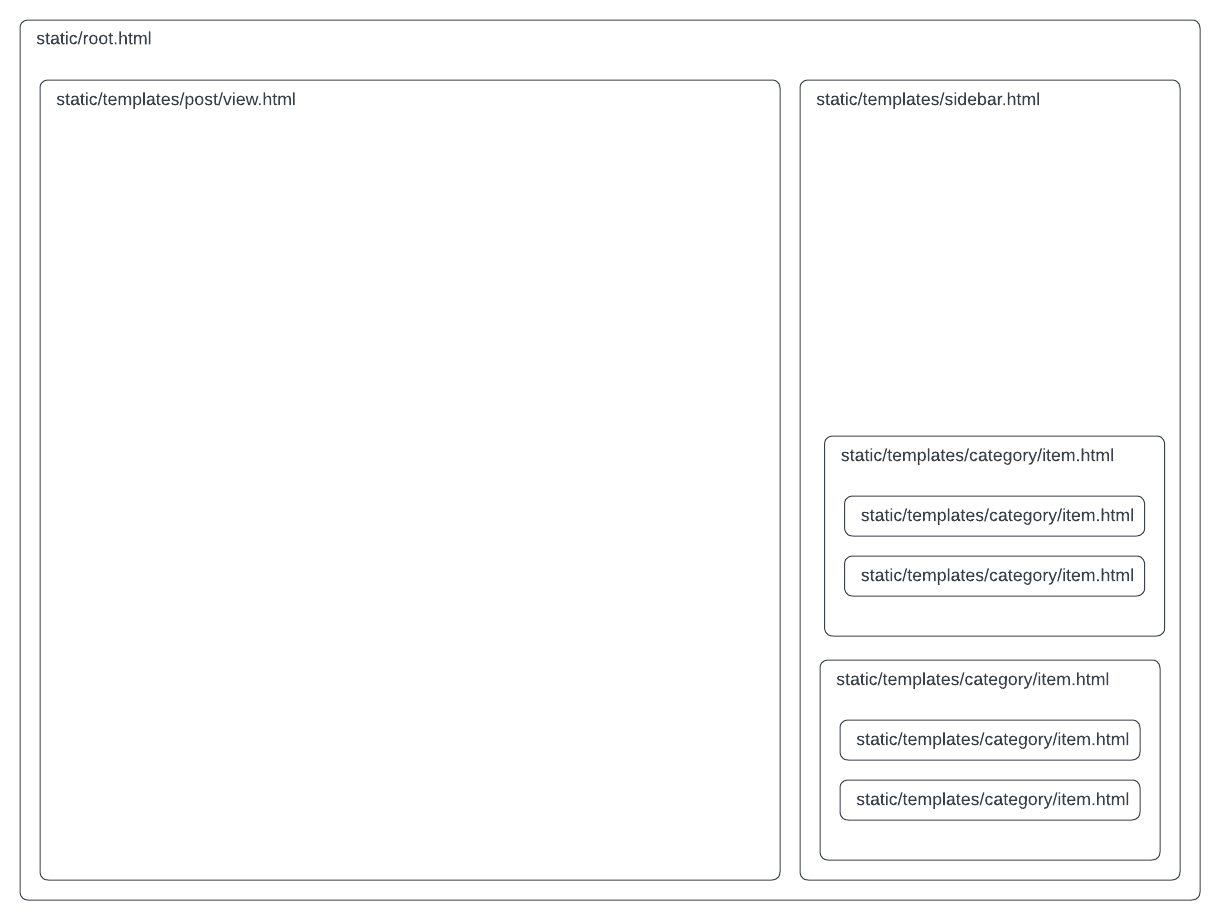
Layout wireframe of post view page
The routes are handled in pages function as follows in which the template html will be replaced in the root using HTMLRewriter modifiers which reads the data from the database and modifies the html content appropriately. The whole blog i rendered on the server side with data from the database. There are other modifiers which modifies the page title, meta tags as well.
.
└── functions/
    ├── index.ts
    ├── posts/
    │   └── [slug].ts
    ├── categories/
    │   └── [id].ts
    ├── media/
    │   └── [id].ts
    └── search/
        └── index.ts
The Admin Dashboard
The admin dashboard is built with React and Ant Components. I didn't care much about optimizing the dashboard or adding any build system, so the react and all other libraries are loaded via cdn rather than using some builder like Webpack.
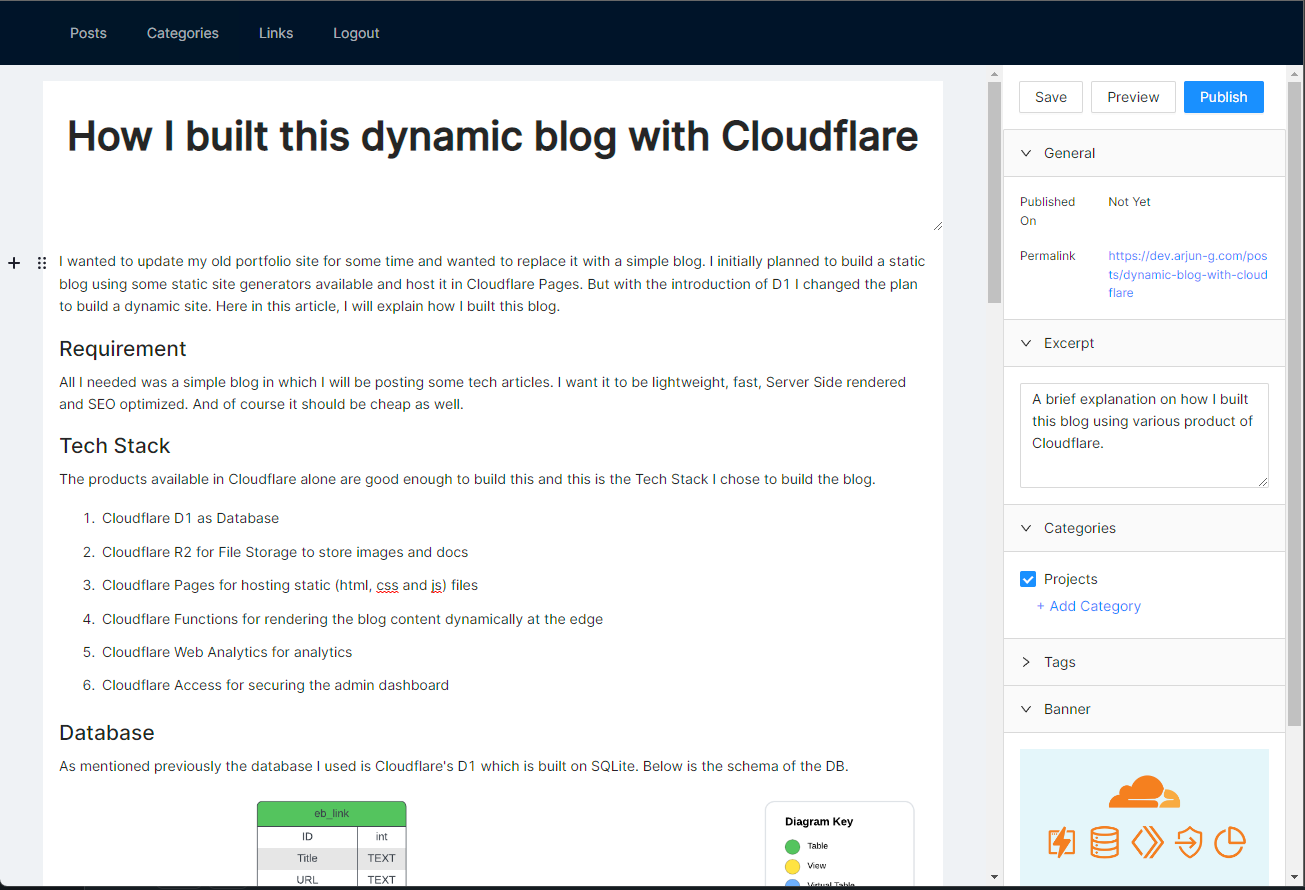
Screenshot of admin dashboard
I didn't want to build any authentication system either for the dashboard, hence I used Cloudflare Access to restrict the https://arjun-g.com/admin endpoint. I just used the pin authentication to login.
Source Code
I have published this as an Open-Source project in https://github.com/arjun-g/edge-blog. Details on how to run and deploy can be found in the repo.
Deployment and Configuration
You can clone and modify the above repo as pe you need. The next step is to configure a Cloudflare Page with auto deployment configured to deploy the repo. Make sure to configure the below in Build settings.
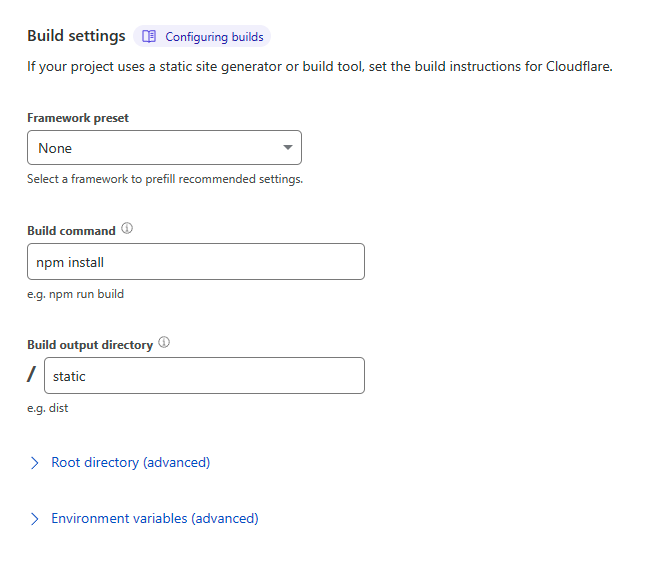
Screenshot of build setting details.
Post deployment make sure the following binding are configured for the application to access D1 database and R2 bucket.
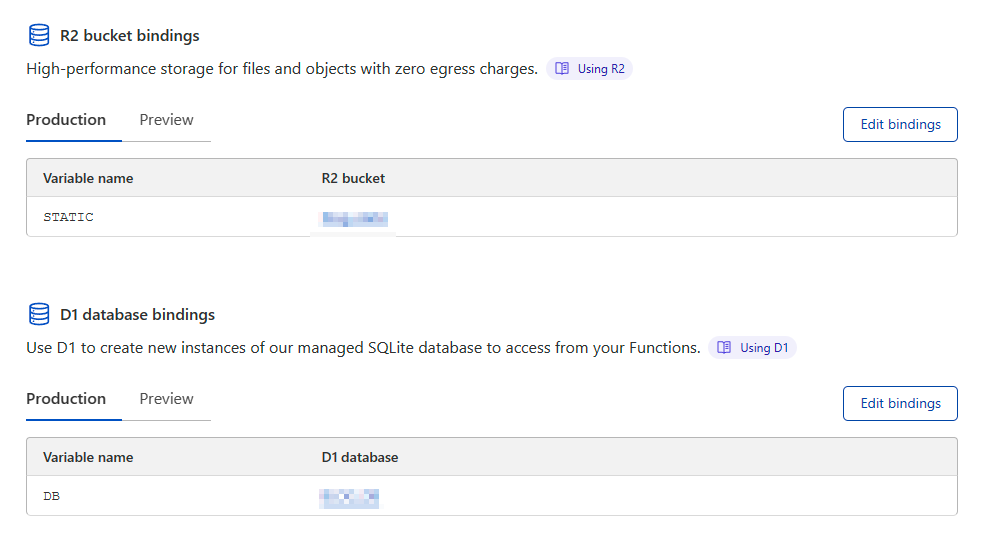
Configure D1 and R2 bindings
Configuring Authorization for Admin Dashboard
For configuring authorization to the Admin Dashboard we have to create Applicaiton in Cloudflare Access. Use the configurations as below while creating the Application.
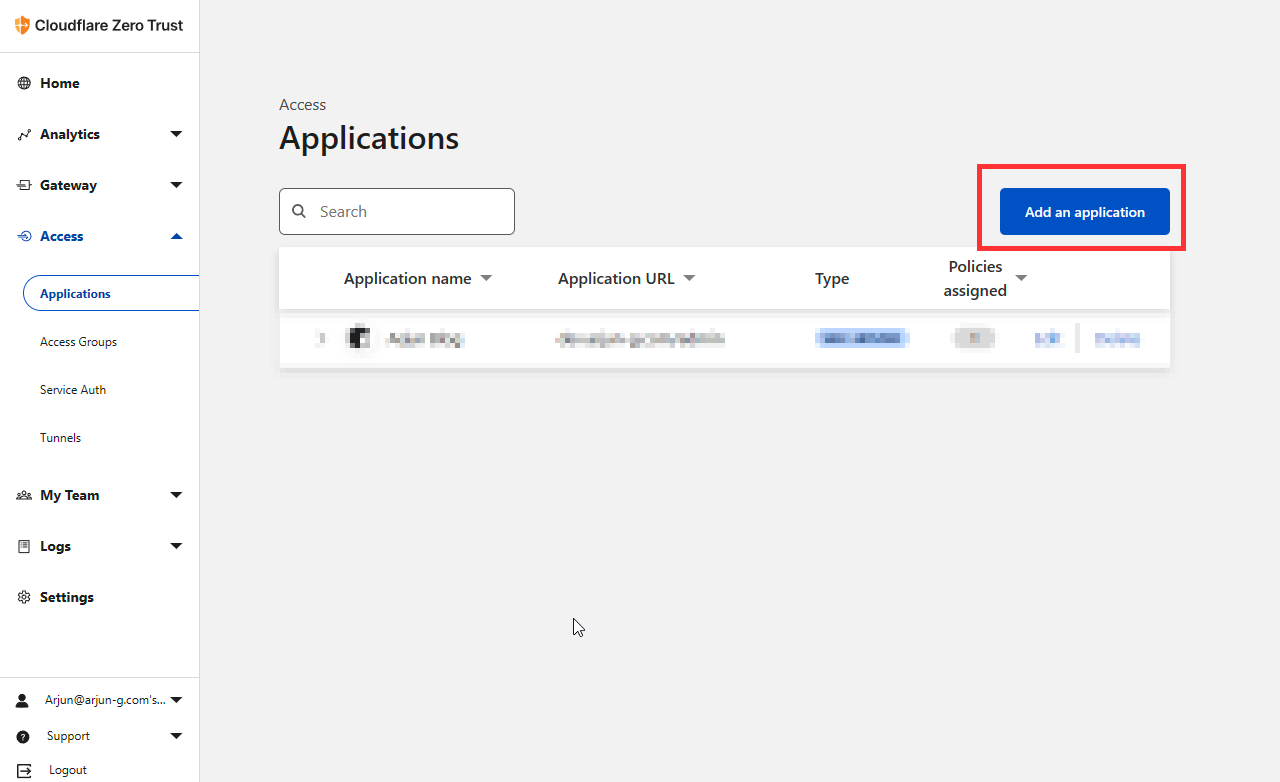
Create a application from Applications page in Cloudflare Access
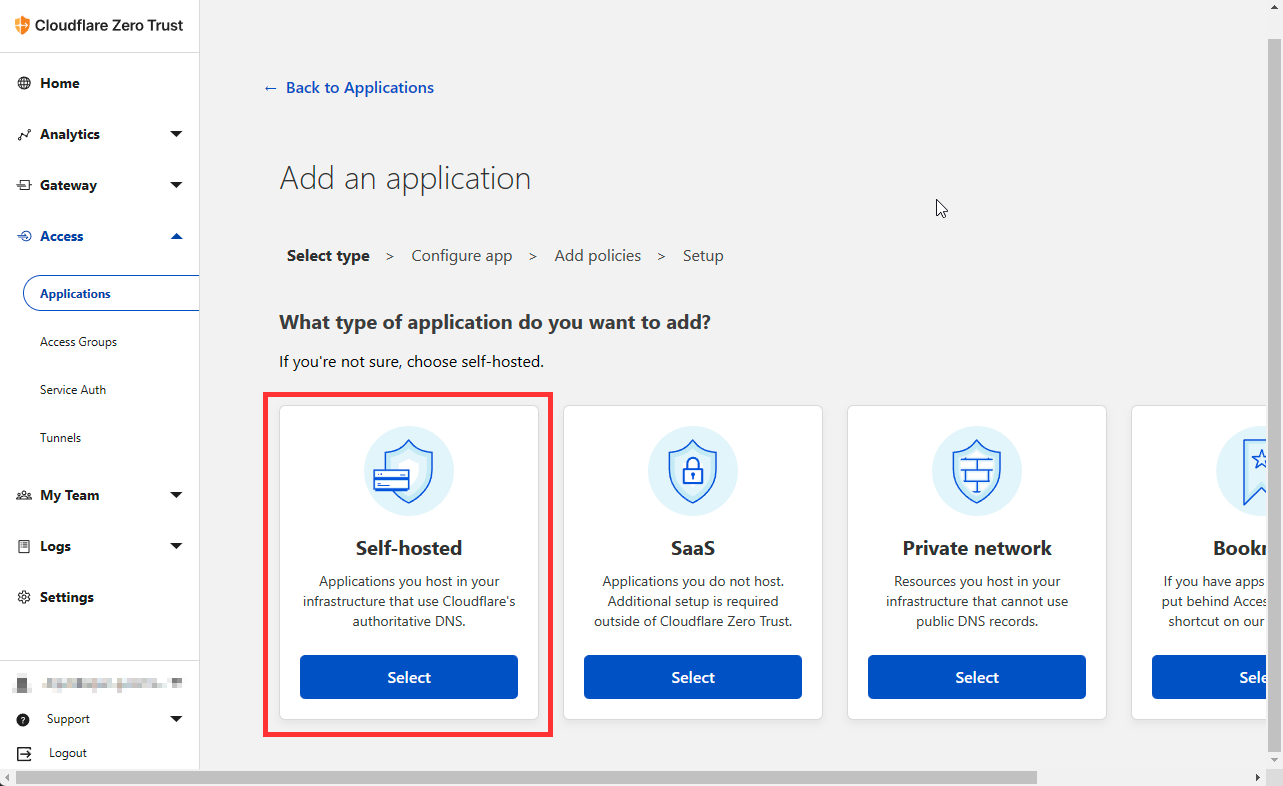
Select Self hosted applicaiton
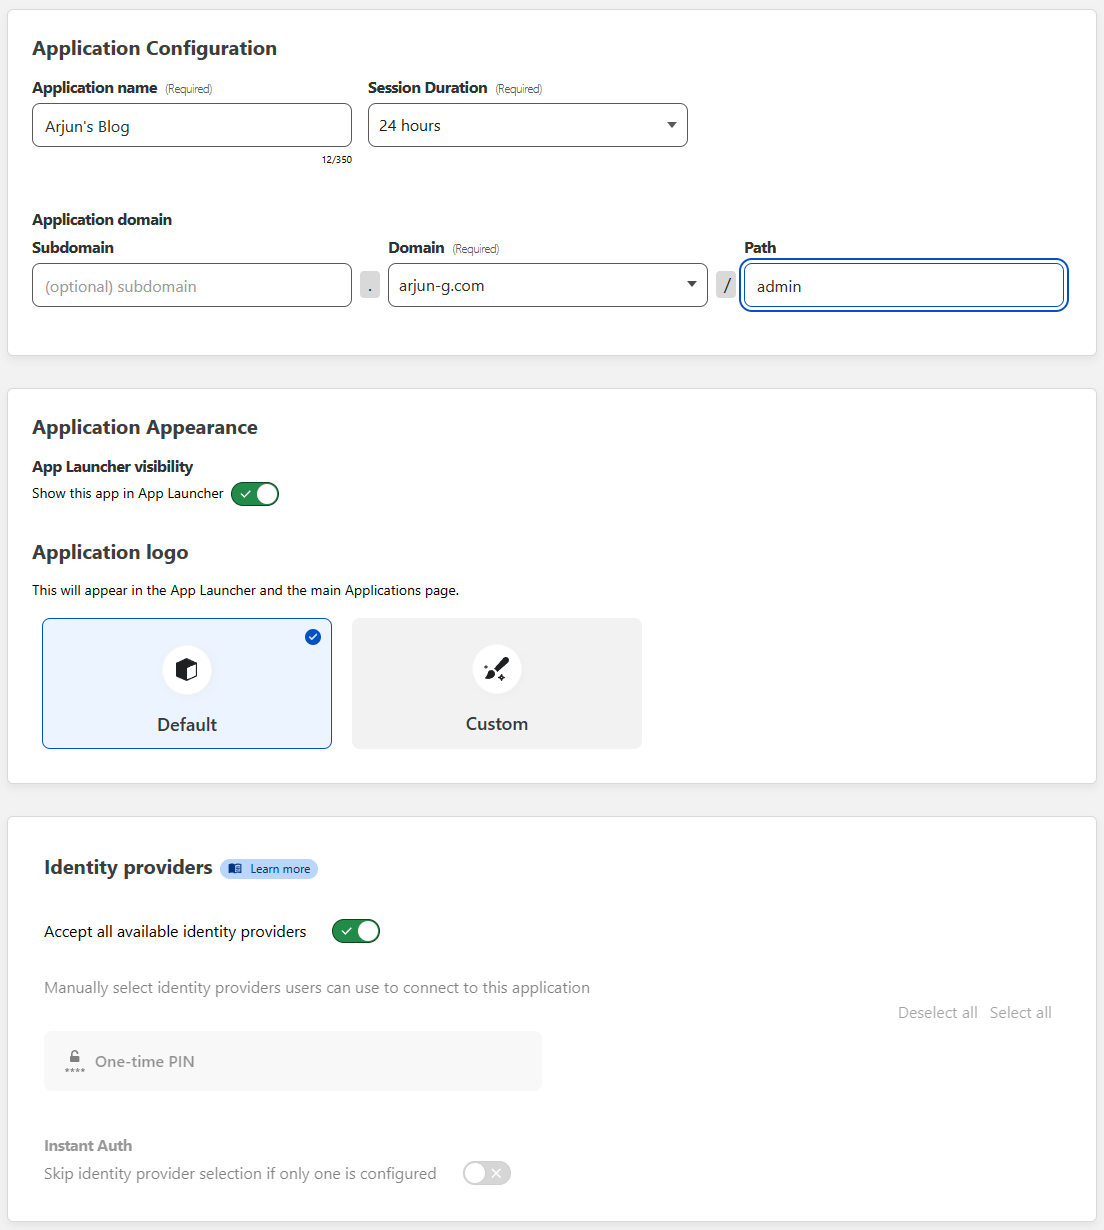
Configure the domain and set the path to admin in application configuration
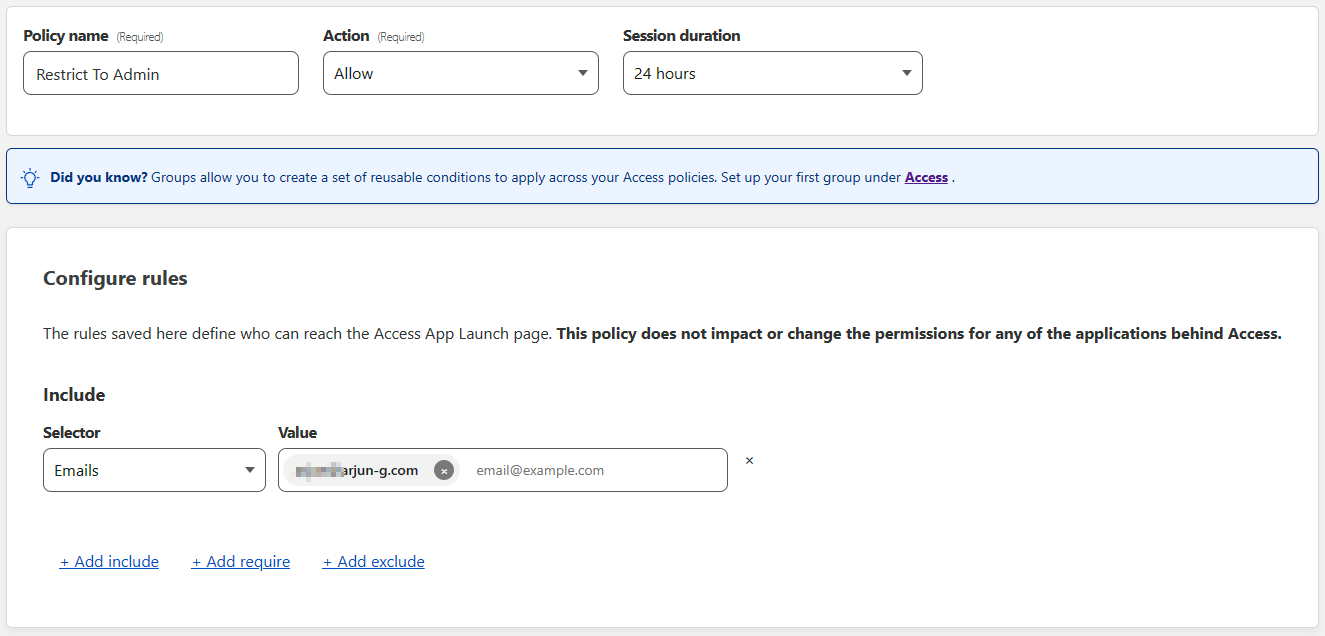
Add a policy to allow once specific rule like matching an email address
Get the Access Application ID and Application Audience Tag from the below options
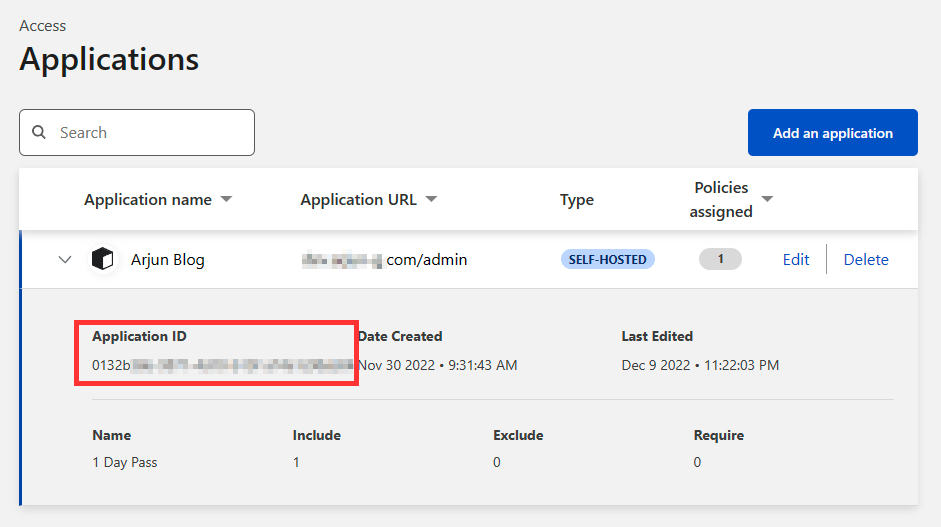
Get the application id
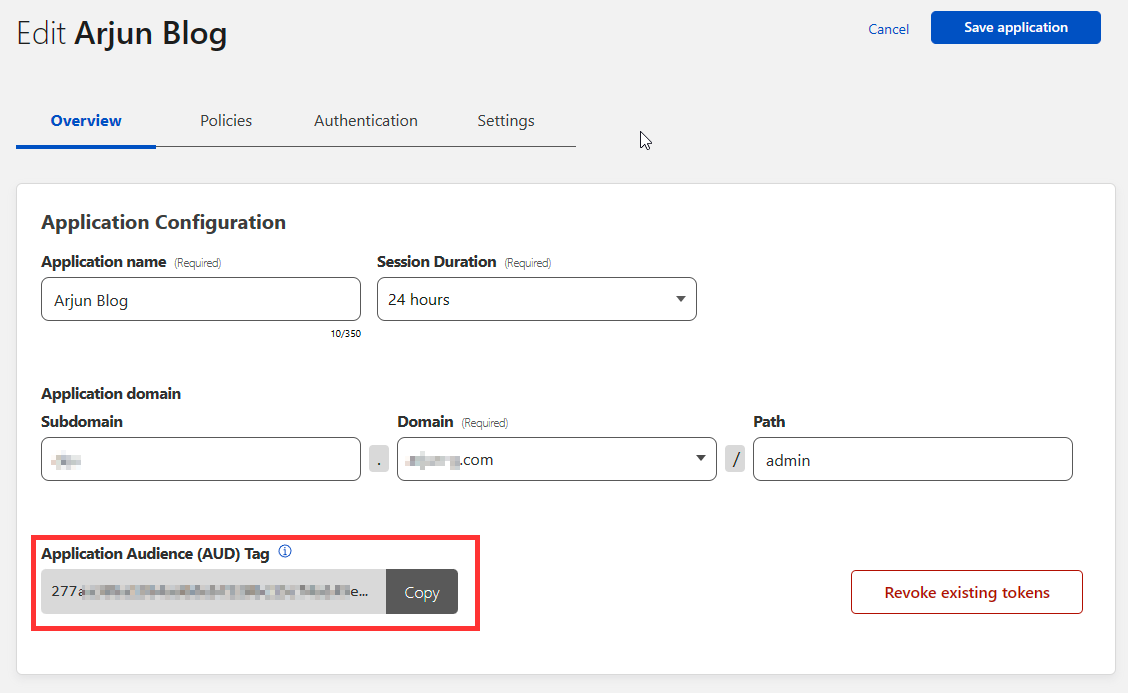
Get the application audience tag
Once you get both the Applicaiton ID and Application Audience Tag configure the below environment variables

Configure your environment variables
Future Plans
I have few more features in plan which I will be adding soon
- Add comments support to post
- Add a newsletter using Cloudflare Worker + MailChannels
- Make the blog fully configurable without the need to change any code
- Make it theme able
All these changes will be pushed to the repo as well.
